Showing posts with label Recipe. Show all posts

Thursday, October 30, 2014

The Most Delicious (and Easy) Baked Beans You'll Ever Make (and They Make A Great Freezer Meal!)


These baked beans are enjoyed by everyone in our house.  They are also great to take along to a potluck (or pitch-in, community meal, whatever you may call it).  They can be cooked in the oven, or thrown in the crock pot to cook for a few hours, then can be kept warm to enjoy at leisure.  Husband has taken them to work in a crockpot.  They don’t all take the same lunch hour, so it worked great.  Husband turned them on low for about 3 hours (I don’t think he even stirred them) and then set them on warm until everyone had the opportunity to eat.  It worked great.  These also freeze well and can be pulled out and cooked from a frozen state.  We always make extra for the freezer.
This is my set up to make several batches


Here they are ready for the freezer and one lucky batch gets to be eaten tonight
 
I put the heavy duty lids on the freezer ones so that they are less likely to get smushed when they are stacked.  Notice the little food lover helping me out.

Before putting food in the pans, label the sides of them, as shown, so that you don't have to move everything all around to figure out what's in there.


Baked Beans


Ingredients

·         1 lb bacon, cooked and crumbled  *click here for an easy way to cook your bacon!*

·         1 lb ground beef, browned and drained

·         1 onion, diced, sautéed with ground beef

·         1 large can Bush’s Baked Beans, original

·         1 can kidney beans

·         1 can lima beans, drained

·         ½ c brown sugar

·         ½ c white sugar

·         ½ c ketchup

Preheat oven to 350℉.   Cook and crumble the bacon.  Baking the bacon in the oven is the easiest.  Brown the ground beef with the onion.  While the meat is cooking, mix the beans, brown sugar, white sugar, and ketchup in your 9x13 pan.  Once the meat is done, add that to the bean mixture.  Stir to combine.  Cover with aluminum foil and bake for approximately 2 hours.  Remove the cover after 1 hour.  Stir a couple times throughout baking.


To freeze:

Cook and crumble the bacon.  Brown the ground beef with the onion.  While the meat is cooking, mix the beans, brown sugar, white sugar, and ketchup in your 9x13 pan.  Once the meat is done, add that to the bean mixture.  Stir to combine.  Cover with aluminum foil and label.  Place in freezer for up to 6 months.

When you want to cook it, preheat oven to 350℉.  Remove beans from freezer and cook for 2 ½ - 3 hours.  Stir about every hour.  Remove the cover after 2 hours

Friday, July 4, 2014

Bakin' Bacon

In case no one has ever shared the secret to easy bacon, I will let you in on this.  I am surprised that I did not know about this until I was well into my 20's with a husband and 2 kids.  We eat a lot of bacon, but I always hated how long it took to make, and need I mention the mess, the splatters, the burned spots on my hands and arms.  I viewed it as a labor of love.  Once I heard I could just place my bacon in the oven, I had to try it out immediately.  I'm sure Husband loved me a lot more after all the bacon I was making. 

All you need to do is get a baking sheet or two.  Make sure this has edges, no cookie sheets.  Bakin' you bacon will make grease and you don't want that all over your oven, trust me.  Depending on how thick your bacon is, you might be able to use one baking pan per pound.  The bacon I get needs about 1 1/2 sheets per pound.  If you need to, you can even use a 9x13 cake pan.

Line your baking sheets with aluminum foil.  I tried to skip this step to have less waste and my bacon stuck to my pans.  I'm not sure if it's my old pans, but I need to line them.  Using aluminum foil makes for easy cleanup anyways.

Put your bacon on the sheets.  You can make designs if you want.  Weave them together to create a small sheet of bacon for a sandwich, or shape them into hearts or letters for a special treat.  Hearts are nice on Valentine's day.

Place your bacon in a cold oven and then turn it on to preheat to 350℉.  You want to start with a cold oven so that the bacon can cook slow.  Set your timer for 15 minutes.  If it's not as done as you want it, add 5 more minutes to the timer and check again.  Keep an eye on it and check frequently as it gets close to done so you don't over cook it.  I keep my bacon in the oven for about 20 minutes.  If there is a lot of grease after 15 minutes, I will drain it, but that isn't very often.

 
Remove the bacon from the sheets right away so it doesn't continue to cook.  Place the bacon on some paper towels to drain the excess fat.


Then save the grease (if you like to use bacon grease).  I save mine in canning jars with reusable storage lids.  You can find wide mouth lids here and standard mouth lids here.  I use them all the time.  They can even be used for freezer storage (like freezer jam).  I use the standard size the most since I have homemade jam and salsa.

 
Once the pans have cooled, crumble up the aluminum foil and throw it away.  Then the clean up is done.
 

Just think of all the ways you'll use bacon now that it's easier to cook.  I like to use it in baked beans.  I will also make extra and crumble it.  Then I place it in a freezer bag and store it in the freezer until I want crumbled bacon for salad or potatoes.


Wednesday, July 2, 2014

My Favorite Potato Soup Recipe


This tastes so much like Olive Garden's Zuppa Toscana and I love being able to cook it in the crock pot.  I can't stand kale, but I'm all for the nutritional benefits of it.  If it's cooked into a soup, I can't taste the bitterness or strong taste of it.  I also use whole milk in my potato soups.  It's what we have on hand.  I also don't think I need to add salt and pepper, the Italian sausage has enough seasoning for us.  This soup goes great with homemade focaccia bread.

First, sauté the sausage and onion

 
While the sausage is browning, I cut the onions and put them in the crock pot.


I add everything else to the crock pot except the kale and milk.  Those get saved for right before we serve it.


Add the chopped kale and milk.  Once it's warmed back up, it's ready to serve.


Crock Pot Zuppa Toscana


Ingredients
  • 1 lb Italian Sausage
  • 2 tsp red pepper flakes, optional
  • 1 large onion, diced
  • 3-5 medium russet potatoes, cut into bit size pieces
  • 2-3 cloves of garlic, minced
  • 4 cups water
  • 16 ozs of chicken broth
  • 2 c kale, chopped
  • 1 c heavy whipping cream or milk 
  • Salt and pepper to taste
Instructions
  1. In a medium sized skillet, sauté the Italian sausage with the onion and red pepper flakes.
  2. Place the potatoes, garlic, chicken broth, and water into your crockpot.   Cook on low for 6 hours or on high for 3-4.
  3. 30 minutes before serving, with crock pot on low, add in the kale and heavy cream or milk.  Season with salt and pepper.  Let the soup heat through and serve.
 

Tuesday, June 17, 2014

No-Cook, Raw Honey Strawberry Jam


I recently bought some raw honey when we picked strawberries.  After I tasted it and realized how amazing it was, I started thinking up ways to use it.  I would definitely not be baking with it.  That would ruin the "raw" of it.  I don't usually like honey, at least not by itself.  I like to put it in my homemade bread or add some to my tea.  Since we had strawberries, I wanted to try making some honey strawberry jam.  The pectin I usually buy is a cook kind, so I did some research and found out that there is an instant pectin that requires no cooking.  This is the kind I used for this - Ball RealFruit Instant Pectin - Flex Batch.  It was super easy and I'm glad I bought four containers.  I need to buy more fruit now, yum!

First I washed the jars and rings (not the center of the lid, just the screw on ring).  I usually wash them by hand, but I just threw them in the dishwasher with the rest of our dishes.


 My dishwasher has a sterilize setting.  I went ahead and used it.  I don't think it's necessary with cooked jam and long term shelf stable canning since you put the jars in the canner and simmer them until you use them.  Since I was making no cook freezer jam, I went ahead and "sterilized" them.


Look at all the strawberries we picked.  These aren't as sweet as the ones we picked at Spencer Farm in Noblesville last year.  These were a different variety and are about twice as big.  Next time we go, I'll call ahead and see if we can pick in the little sweet strawberry patch.


 I needed to rinse these off.  I filled my sink half full with cold water and added about 1/2 cup of vinegar.


Look at that dirty water!


I put some rags on the counter and let them drip dry in the colander.  I don't need strawberry stains on my counters.


I took the stems and leaves off of about 2 cups of strawberries and instead of mashing them like I have in the past, I used my awesome Ninja blender that Husband got me for Christmas.  I used the pulse button a couple times and it chopped them up really nicely.  It works better for smaller batches.  When I filled it up and tried this, I had to pulse it a lot more to get all the strawberries chopped and ended up pureeing a lot of it so it was not as chunky as I like.  As long as I stayed around 7 cups or less, it worked great.  The strawberries need room to move around.  The model I have can be found here, complete with single serve blending cups.  It's currently marked down!


Nicely chopped and ready to be made into jam.


I put the strawberries in a bowl and added 1/2 cup of honey and 2 tablespoons Ball instant pectin.


Then I stirred it for 3 minutes.


I poured it into my half pint jars.


I then let it sit on the counter for 30 minutes to set up.  I turned it gently once about 12-20 minutes into it since the strawberries were all floating near the top so that the strawberries were dispersed throughout the jam.


I was a little concerned this wouldn't set up with honey since it's liquid and sugar isn't, but it actually set up a little thicker than the patch I made with sugar.  This also tastes so much better.  It has more depth to the flavor then the sugar sweetened one.  It was also so fast to make since I didn't need to cook the pectin.


No-Cook, Raw Honey Strawberry Jam

makes 2 half pint jars

1 2/3 cups mashed strawberries
2 Tbsp Ball RealFruit Instant Pectin
1/2 cup raw honey
(Do not make more than 6 jars per batch or it may not set up.)

Stir pectin into fruit slowly to avoid clumping.  Add honey.  Stir for 3 minutes.  Spoon or ladle into clean freezer jars.  Let stand at room temp for 30 minutes.  Enjoy now, will keep in fridge for about 3 weeks, or freeze for up to one year to enjoy later.

Plastic freezer jars or glass jars with straight sides are recommended.  Leave 1/2 inch headspace to allow room for expansion during freezing.

Monday, June 2, 2014

Healthy Alternative to Key Lime Pie


I love to eat dessert at the end of the day.  I wish I didn't, but it's my weakness.  I try to keep unhealthy snacks out of the house.  I do have a bag of fun size chocolate candy as a good behavior award for my first grader.  It's very hard to stay out of it.  When I buy ice cream for the kids, I eat way too much.  I have found that it helps to have healthy sweets to eat.  Sometimes I just eat prunes, apples with peanut butter, or a peanut butter banana protein shake. 

The other day, at the store while buying yogurt, I saw some greek yogurt with mix ins.  It was on sale and about the same price I pay for plain yogurt, so I bought some to try them out.  We had banana yogurt with dark chocolate and almond pieces to mix in, coconut yogurt with roasted almond pieces and dark chocolate to mix in, and key lime yogurt with white chocolate and crumbled graham crackers to mix in.  Nobody really liked the banana.  The coconut was the right amount of sweet, had slightly salty almonds and the chocolate fit perfectly.  The key lime was ok.  The graham cracker wasn't very tasty. 

We decided to try to make our own key lime pie yogurt.  At first we tried graham crackers and white chocolate chips.  It was ok, we felt like we didn't need to white chocolate chips.  Next we tried just plain graham crackers.  The texture was off.  Then we tried smashing a nature valley granola bar and adding that.  It was so far the best.  We then tried adding sliced almonds or crushed walnuts to make it a little more filling and hopefully improve the taste and texture.  Now that was perfection.  I have eaten it almost every day for a month now, and still love it.  I don't usually enjoy the key lime yogurt, but with these mix ins, it tastes so much like one of my favorite desserts.

Just look at the nutrition facts


Marie Callender Key Lime Pie
Calories: 430
Total Fat: 18g
Total Carbohydrate: 62g
Protein: 5g

Greek Yogurt Key Lime Pie For One
Calories: 345
Total Fat: 16g
Total Carbohydrate: 36g
Total Protein: 17g

You can also enjoy it without the nuts.  I prefer it with the nuts, but they add a quarter of the calories.

Greek Yogurt Key Lime Pie For One (without nuts)
Calories: 245
Total Fat: 6g
Total Carbohydrate: 34g
Total Protein: 14g


Greek Yogurt Key Lime Pie For One

1 container Chobani Key Lime Greek Yogurt
1 Oats 'n Honey Nature Valley Granola Bar
1/8 cup or 2 Tablespoons walnut pieces or sliced almonds

Mix them all together and enjoy. 

The add-ins will fit in the yogurt container so no need to dirty a bowl


Saturday, May 24, 2014

Quick and Easy Weekend Brunch, Sausage and Cheese Balls


We had a baseball game from 10:30-12:30 today.  We needed something quick and filling to last us till we could get a late lunch.  I pulled out some breakfast sausage from the freezer a couple days earlier so I could make sausage balls.  The prep on this is pretty quick and can even be done the night before.  I like to mix this in the stand mixer so I don't get my hands too dirty.  I shape the balls with one hand and a spoon.

These are also great appetizers or finger foods for a party!

To avoid sticking, you should cook these on parchment paper.  It sticks to greased aluminum foil.

Once cooked, I put the balls in a kitchen towel lined bowl to soak up any excess grease and to hold in the heat while we eat.  That way when we go back for seconds they are still warm.


The kids love that these are in the shape of balls and eat them right up.  
 

 I served it with fruit salad. The sweetness of the fruit complemented the saltiness of the sausage balls


Sausage and Cheese Balls

 
Ingredients:
  • 1 1/2 cups all-purpose flour      
  • 1/2 teaspoon coarse salt
  • 1/4 teaspoon ground black pepper
  • 1/2 teaspoon paprika
  • 1 1/2 teaspoons baking powder
  • 2 cups grated cheddar or Colby jack cheese 
  • 1 pound breakfast sausage
  • 3 tablespoons melted butter
Preheat oven to 400 degrees.
 
In mixing bowl, mix together flour, salt, pepper, paprika, baking powder, and cheese.  Add sausage and butter.  Mix until well combined.  Roll mixture into 1-inch balls. Place balls about 1/2 inch apart, on a parchment-lined baking sheet. Bake 20-25 minutes or until balls are golden and cooked through. 
 
Serve warm.


Friday, May 16, 2014

The Best Pizza Crust Recipe Ever!


I must share a recipe with you.  I only recently began using it for pizza.  I adapted it from a focaccia bread recipe.  I had been constantly changing the dough I use for pizza because there was always something I didn't like about it, but we have been using this one to make our weekly pizza for several months now.  I love that you can tell it has olive oil in it.   It also has the perfect pizza crust texture.  It is slightly chewy and not too doughy.  It tastes so good that we don't have leftovers when I make pizza any more.  I use to work at a well known pizza chain, so I know my pizza!

If only one pizza crust is required, either halve the recipe or freeze half.

To prevent big bubbles from forming in the middle of your pizza, poke it all over with a fork.

I use Hunts pasta sauce (garlic and herb variety).  That gives me enough to make 3 pizzas.  I usually only make one pizza at a time so I put the extra sauce into two Rubbermaid takealongs 1 cup containers for liquids.  You can find them here.  You want to leave about 1/2" room at the top.

Here it is ready to go in the oven.


Warm and cheesy, and making my kids beg to not wait for it to cool down

Pizza Crust

by: asimplehousewifesblog.blogspot.com
makes 2 pizza crust

5 1/2 cups bread flour (all-purpose can be used as a substitute)
1 package or 2 1/4 teaspoons fast rising yeast
1 Tablespoon Italian seasoning
1 teaspoon salt
2 cups warm water (120F)
4 Tablespoons olive oil, divided
1-2 teaspoons garlic salt
Grated parmesan cheese (parmesan and Romano cheese can be used as a substitute)
Desired pizza sauce, toppings, cheese

In mixer bowl, combine flour, yeast, Italian seasoning, and 1 teaspoon salt.
With dough hook, stir in water and 3 Tablespoons olive oil for 5 minutes or until well mixed and dough is slightly sticky to touch.  If it is too moist, add flour a tablespoon at a time until it is the right consistency for bread.  If it is too crumbly and dry, add water a teaspoon at a time until it is the right consistency.
Cover bowl and let dough rise in a warm place until doubled in size (30-60 minutes)
Turn dough onto floured surface and gently knead for one minute to release air pockets.
Lightly oil two baking sheets or pizza pans.
Divide the dough in half and place each half on a baking sheet or pizza pan.
Press or roll into 12-14 inch rounds or into desired pizza shape.
Cover rounds with clean towels and let rise for approximately 30 minutes.
Preheat oven to 400F.
Brush the crust of each round with 1/2 Tablespoon olive oil.  Sprinkle crust with 1/2 to 1 teaspoon garlic salt and grated parmesan cheese.
Put any kind of sauce, toppings, or cheese you like.
Bake for 15 mins or until crust is golden


Wednesday, May 14, 2014

Two Pot Chicken Pesto Pasta with Broccoli

We are just starting to potty train 2 year old M and so we have been going to the bathroom every 30 minutes.  The first day we just had leftovers, but we couldn't do leftovers two days in a row.  I had to come up with a quick and easy meal.

This meal is one I can make in 30 minutes.  I get out all the ingredients (not pictured is milk and parmesan cheese since I need that later). 

I freeze my own spinach.  Sometimes we can't finish that big bag of spinach that I buy so before it goes bad, I bag about 2 cups and freeze it so I can add it to soups or smoothies later. 

I buy my chicken in bulk then slice and place 2 pounds in a freezer ziplock quart size bag.  They are then already sliced for meals and thaw quicker then whole chicken breasts.


I boil the spaghetti in a pot while I cook the chicken. 


Then when the chicken is done and the pasta is almost done, I throw the broccoli on top of the chicken to steam while I drain the pasta. 


I had a lot of liquid so I drained most of it.


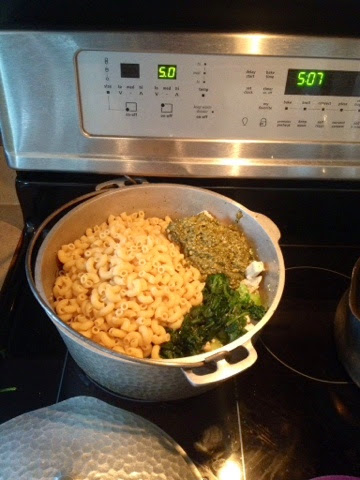
Then, I throw the pasta, pesto, and a couple handfuls of spinach in and stir it all together. 


Then I mix in a little milk and parmesan cheese.


Then it's ready to serve.  Perfect for busy days.


Chicken Pesto Pasta with Broccoli

8 oz elbow pasta
1-2 pounds sliced chicken breast
16 oz frozen broccoli florets
2 cups spinach, frozen or fresh, coarsely chopped
1 container Classico Pesto
1/2 cup milk
1/4 parmesan cheese

  1. Bring a large pot of water to boil for the pasta. Once it reaches a full boil, add the pasta and continue to boil until the pasta is tender (7-10 minutes). Once the pasta is tender, drain the pasta in a colander.
  2. While the pasta is cooking, thinly slice the chicken breast. Over medium heat, add about 1/4 to 1/2 cup of water and the sliced chicken.  Sauté until it is no longer pink (about 5-10 minutes).  Add broccoli to top of chicken and cover pot to allow broccoli to steam for approximately 3 minutes or until done.  If desired, you can then drain excess liquid.
  3. Add the pesto, pasta, and spinach to the skillet. Stir to combine and remain on heat for 5 minutes to warm back up.  Turn heat off.
  4. Add the milk and parmesan cheese.  Stir to combine.